Sunday, November 11, 2012

Thanks for the lift...

Hello (again) Blogger friends!

As promised, I'm popping in with creation #2 of 3 produced on a very productive Saturday!

If you'd like to go in order, check out the first card.


For this card, I tried something that I usually feel not-so-sure about...Masking.

Most of my attempts at this beautiful technique usually come out leaving a LOT to be desired..lol.


This card, on the other hand, quickly stole my heart.
So ignoring the tad bit of ink bleeding, this card has become one of my favorites!
This was my first time using my Papertrey Ink "Up, Up & Away" stamps and die. 
Boy, oh boy, how I love it!

I masked the sky area using neon pink post its, which ended up being a not-so-great idea because it bled a little. I colored the blue with a Copic marker and stamped a couple clouds from the set.
I didn't really care for the clean edges of the clouds, so I tapped a Q-tip in my ink and softened them and created a couple of them free hand. I used the same stamp and soften technique on the sun.
I heat embossed and used colored pencils to create the hot air balloons. A sentiment from the set and a sprinkling of tiny rhinestones completed the card.


Do you love it as much as I do?
(I really hope so...)


This creation is a submission for 2 challenges:
CAS(E) this Sketch #5


&
The Play Date Cafe #157
 (Yes, I know there's no blue in this scheme...but I couldn't help myself! Hope I still qualify)


Thanks so much for stopping by!
Please take a moment and join me...I love making new friends :o)


Pretty in purple...

Hello Blogger friends!

OMG...I'm so excited to see the number of people joining me is going up!
(That means there'll be more people to play along when I start my challenge blog...yay!)
Thank you, thank you, thank you


Anyhow, I'm here today with the first of three (yes 3) cards that I created today for a couple different challenges...

Here it is :o)

This creation was inspired by the layout from my last creation
I ended up loving the simple layout so much that I wanted to use it again (and again in the future, I'm sure).
This is a submission for 2 challenges:

The Play Date Cafe #157

&


CAS-ual Friday #78 (Using torn paper)


Here's closer view:
Despite looking a bit on the 'retro' side, I really like how it came out. However, I still have that sinking feeling that something's missing. If you see it, tell me what it is...I sometimes struggle with know when a card is really finished...I'm sure you know what I mean.

Thanks so much for stopping by! 
Please take a moment to comment and let me know if you feel like it's missing something and let me know how you deal with that 'I-don't-quite-think-it's-finished' feeling.


P.S. Join me if you haven't already...I'll be releasing details on my upcoming challenge blog very soon!
(I'll also me looking for a couple of members for the design team)

Have a great day :o)


Friday, November 9, 2012

Thinking of you...

Hello Blogger friends!

I just wanted to pop in with a quick submission for this weeks CASology challenge.


I must say that I LOVE the one word cues that they give you, they instantly light my creative fire...

As you can see, this weeks cue was ORANGE.

Here's what I came up with...

I love that this card was created with a stamp that only cost me $1! 

A closer look at the coloring and detail.


Unfortunately, you can't see from the photos that the medallion has shimmer from my trusty gel pen and the orange mat is also shimmery. (sigh)


I really hope you've enjoyed today's card!

Please take a moment to comment and join me...
Have a wonderful day :o)


Saturday, October 27, 2012

Getting Krafty...

Hello Blogger friends!

I've popped in this morning after a late night of card making to share one of my 'Krafty' creations.


Having been inspired by a number of talented paper crafters, I armed my stash with kraft card stock in the very beginning of my card making journey. I have to admit though, I wasn't really a huge fan of it. Being an admirer of the clean and simple style, I couldn't really find the charm in creating on what reminded me of paper grocery bags!
Despite my distaste for the kraft variety, I used it because everybody else did  it's always on trend.

Then one day, I saw this beautiful card created by Jennifer Mcguire and my love affair of kraft began...


Skip ahead to yesterday, when CAS-ual Fridays presented us with this Kraft On challenge!

Create a clean & simple project using Kraft


Challenge accepted!

I'm so, so, so happy with the way it turned out!


Loving the slight sparkle from the gel pens :o)


Okey Dokey, that's it for now.
I have another krafty creation that still needs to be photographed, so look out for Getting Krafty II.


Thanks so much for stopping by and please take a moment to comment and join!
Have a wonderful day!


P.S. I read EVERY SINGLE COMMENT and APPRECIATE them ALL! Thanks for the wonderful words, they mean so very much to me <3

Thursday, October 25, 2012

Happy Day...

Hello Blogger friends!

I'm back today with another CAS(E) This Sketch entry. I'm really loving the clean and simple sketches that they offer, and this sketch did not disappoint! 


So many things ran through my mind when I saw it, but I had to resist overwhelming my creative senses. I'm sure that I'll create a few entries for this sketch because it really melted my butter (thanks for that one Truvy*)


Here's what I came up with:

As I dissected the sketch, I couldn't get the idea of a creative fold out of my head, so I went with it!
(I'm not sure if you can tell from the photo, but it's an asymmetric trifold card that opens from the top.)


Here's a close up of the juiciest part:

I really, really, really love how this card came out!

I'm so excited to dive back into my stash of goodies and create something else from this awesome sketch. 

If you haven't already, go check the super talents over at CAS(E) This Sketch! I know you'll enjoy it.


Please take a moment to leave a comment and join me! 

P.S. I'll be starting a challenge blog soon...the only way you can stay up-to-date is to add your lovely face to the list to the right  --->>>

*P.P.S. That's Truvy played by Dolly Parton from one of my absolute favorite movies: Steel Magnolias

Sunday, October 21, 2012

The holidays are on their way...

Hello Blogger Friends!

It's been a looong time since my last post. I know. Please forgive me.
I've been working really hard at trying to get my affairs in order with my new life her in the big apple, and as a result, my crafting (and blogging) has suffered. 

Despite not actually DOING a craft projects, I've been keeping up and drooling over  admiring my favorite blog challenges. 

In my internet hopping, I've come across and joined a brand new challenge blog called CAS(E) this Sketch. It's a cool clean & simple card sketch challenge which is right up my alley. I missed the 1st sketch, but I just had to make time to play along with the 2nd one:


As soon as I saw it, I had a MILLION ideas! 
(Don't you hate/love when that happens?)


In addition to this sketch, I decided to play along with yesterdays challenge over at 365 Cards.
The challenge was to use 3 items, colors, images, etc. that started with the letter "B". Fun right?!?

Here's my creation:

The inspiration from the sketch is obvious, and the 3 "B's" I used are:
Blue (navy), Bling, and Bakers twine. 
For good measure, I added Bows and a Background stamp :o)


Ok friends, that all for now. Thanks so much for coming by and checking me out. 

Please take a moment to leave a comment and follow me...I'll be starting my own challenge blog very soon and it would be great to have participants. 

I'm also looking for a couple people to be a part of the design team. 
Leave a comment if you're interested.


Wednesday, September 19, 2012

So very grateful...

Hello Blogger friends.


It's funny how things work sometimes...
Last night, I created this card for the CAS-ual Friday 70 Challenge
The theme this week was to create a black & white card with one color. 

After much brainstorming, I came up with this design using a floral type swirl stamp and my newest Papertrey Ink stamp/die combo.


While browsing through the blogs I follow, I came across another challenge that it may work for too

I'm not 100% sure if the bits of black and green would disqualify it for a white challenge, but it's worth a try right? This is my first time playing over on this blog, but I liked it so much I started following it!


Once I'd finished photographing it and getting it to look halfway presentable, I began wondering who I would send this beauty to...

I immediately decided that I wanted to send it to my former boss/good friend/second mother, Kathy.
There really wasn't anything specific that I was thanking her for, it was just for being who she is in my life...

Then, my doorbell rang.

There was the mailman with an unexpected package...

Who was it from? 
KATHY!

Crazy right?!? It was just a few items that I'd left behind in the move, and a quick catch-up letter, but it was the timing that was so awesome...

It's just like Kathy to send me a little piece of the place I miss so dearly, at the very moment that I needed it. 

Now there's a tangible reason for this thank you card.


I can't wait for her response when she gets it!


Thanks for stopping by & have a great day.


Tuesday, September 18, 2012

Holy Cannoli!

(Disclaimer: This post has NOTHING to do with cannoli)

Hello Blogger friends.

Oh my word! It's been a lot of nothing going on here on the Simi-Sweet Creations blog...well, I can't say the same about my life! I've made some huge changes, I traded my job and my life in sweet, quiet Canton, Ga for the craziness of The Bronx, N.Y. (Heaven help me). 

My oh my, the things we do for love. To make a long story short, my fiance and I had been in a long distance relationship for 6 whole years, so I moved up here until my sweetheart graduates with a Masters Degree...

It's been an adventure, to say the least, but we're settling in quite nicely. I'm working diligently to merge our things and carve out my space in this tiny cozy apartment. (I'll be posting a few of my decorating projects in future posts...I promise)


Ok, now that you're caught up on the last month of my life...here's the meat and potatoes of today's post:


Sponge Daubers!

I know, not very exciting stuff. Surely not worthy of the 'Holy Cannoli' blog post title...


(Insert infomercial announcers voice here)
But wait, There's more:


Pretty, D.I.Y, refillable, virtually free, sponge daubers!


How did she do it you ask? Here's how:


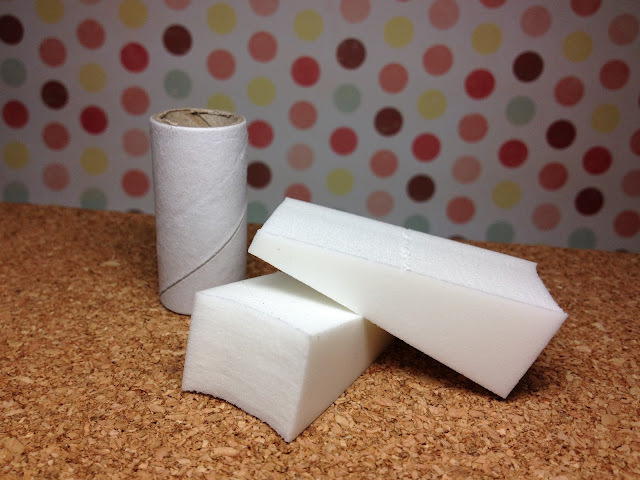
About two hours ago, I was sitting here at my craft desk, gathering supplies for a blog challenge project (we'll get to that tomorrow). I dug into my washi tape box and found an empty little cardboard tube. I absentmindedly stuck my finger in it and it reminded me of a sponge dauber. I went to toss it in the trash when the light bulb came on as bright as ever!

I'd already had cosmetic sponges on my desk because I was using them with some distress ink for another project. (they hadn't worked very well either)


Just to see if I could, I stuffed one of the sponges into the little tube and HOLY CANNOLI, it worked!


Once I had it looking like it was supposed to, I went digging in my washi tape box again to find out where this wonderful little tube had come from...

A little investigation lead me to these rolls of paper tape that I'd bought in a clearance bin nearly a year ago! I had never used them on a project because I could never find the right way to use them. The material is much heavier than washi tape and not as easy to work with. Fortunately for me, they were so cute that I hadn't given them away when I purged my craft area before the move...

Here they are 'naked'


Here they are all dressed up!
Because they came from a roll of paper tape, they were super easy to decorate...

Thee best part about these cuties is that they were totally FREE! How much do you love that?!?
Wait, there's something better about them...they're refillable! YAY!
All I have to do is pop out the cosmetic sponge and pop in a new one.
Comparing the cost of 3 daubers at $3-$5 and the cost of a package of makeup wedges (mine had 28 pieces) for $1...I'm sure you can see where I'm going with this.
Ok, back to my paper crafting...I have a TON to get caught up on.


Thank you so much for stopping by. Have a wonderful day!


Wednesday, August 1, 2012

I'm on the move...

Hello Blogger friends!

I just wanted to drop by to explain my being missing in action...I'm moving.
No, not your run-of-the-mill across town move, I'm moving from GA to NY! (over 900 miles!)

Anyway, all of my beloved craft items are all boxed up and ready for this loooong drive.
That means: No challenges. or anything dealing with card making fun :o(

I can however, share random crafty things that I've done...

With that in mind, I'd like to share a story:

Once upon a time, there was a girl who got her very first apartment. One of her first purchases for her new place, was a simple mirror in a simple black frame. She was satisfied with her mirror, I mean after all, it did a great job at reflecting (as mirrors should). 

All was well until the girl was sent an invite to this fascinating world called Pintrest. In this wonderful place, she found so many things that made her "ohh and ahh" and swoon...

Suddenly, her simple mirror became the ugliest thing she'd ever seen. 
Hurt, her mirror decided that it would do anything to stay in her good graces. The girl whipped out a brush and a leftover paint sample and slathered it with a not-so-attractive shade of jewel-toned blue. 

Both the girl and the mirror knew immediately that the paint had made things go from bad to worse...


(especially with the messy white trim on the inside)


Discouraged, the girl turned to the wonderful world of Pintrest where this lovely wreath inspired her. The next day, the girl went to her local craft store and picked up a bunch of yarn and a few sheets of felt. 

With all of the supplies in hand, they got comfy on the couch with a glass of wine and an evening of good television...

The process was tedious, but once they saw it coming together they were both happy to be doing it!


After a few hair-pulling relaxing evenings of work, it was all wrapped up in soft, fuzzy yarn!


The girl added a few felt flower and Voila! 
Sorry for the not-so-great photos :o(


The girl and the mirror were both very proud of the outcome...


...and they lived happily ever after.


The End.


Thanks so much for stopping by & reading my corny little story :o)
Hope you enjoyed. Have an amazing day!


Tuesday, July 17, 2012

Using floral stamps (S.Y.S Day 7)


Hello blogger friends!

I'm back today after taking a much-needed long weekend. I'm playing catch-up in the Stretch Your Stamps class that I'm taking. As a matter of fact, I completely skipped over day 6 (a bonus day that was given this past Saturday), so look for that post soon.

Anyway, the focus of day 7 was floral stamps. They taught some fantastic techniques including coloring on glitter, and shading with a blender pen. However, the inspiration for my card set came from another card that was linked as a sort of bonus idea. It simply floored me! It was so right up my alley, that I had to give the idea a go...

Here's my take on it:

Yes, I know, I kinda over did it with the flowers. I love the idea of it though. I know now, that with this  style, a little less is more. You know me though, I couldn't just stop at one version...


Here's the purple...


The green...
Actually, this was the first one I made (my favorite color is green)


And finally, the yellow...

The full set:

   
I thought the trendy gradient look would be lovely with the bold, black floral stamps and I love the way they turned out. I'm still learning how to work with the Copics (hence the streaked look), but I actually liked the water color type effect. 

Well that's all for now. Please take a moment to join and comment! I'm strongly considering starting a bi-weekely card challenge blog but I need participants...

Thanks so much, and have a fabulous day!


Friday, July 13, 2012

She's at it again...

...and by she, I mean me ;o)

Hello blogger friends!

I'm sure you're wondering if I have any semblance of a life when I've been blogging so much as of late.

Well to answer your question: Yes, I do have a life. I just have a lot of pockets of free time throughout the day...having no children helps too.

Anyway, I'm here again with another card for the Stretch Your Stamps class.


Just a reminder: The focus of day 5 was to stretch your sentiment stamps. I have to admit, I may have cheated a little because the main sentiment isn't a stamp, it's a rub-on. I redeemed myself by using the 'hello' & 'hiya' sentiment stamps to make custom washi tape. I really like how it came out.

Here's a closer look:
I might have been a little heavy handed when transferring the rub-on image...lol.


Please comment, join, & most importantly, be blessed.


P.S. I'm thinking about starting a card challenge blog of my very own...
Ideas? Comments? Thoughts? Please share below or email me at simisweetcreations@yahoo.com


Using sentiment stamps (SYS Day 5)

Hello blogger friends!

I'm baaaaaack! This is the most I've ever posted in a week. 

So, last night (or should I say this morning) I posted a card for 2 challenges:


Well here I go again! I just couldn't resist either of these challenges...with that being said, here's my 2nd  (of at least 3) entries:


In addition to entering them in the challenges mentioned above, I'm also practicing the technique form day 5 of the Stretch Your Stamps class that I'm participating in. The focus is on using sentiment stamps. I decided to give my sentiment the starring role instead its usual supporting role. 


"Alright Mr. DeMille, I'm ready for my closeup..."
I cannot even tell you how much I LOVE this stamp!


I guess that's all for now.
As always, I thank you for stopping by to check me out in my little corner of the blogger-verse .
Please take a moment to comment...and join me!

Until we meet again...


A CASe of insomnia...

Hello blogger friends! 

(Disclaimer: I cannot be held responsible for spelling/grammatical errors and/or babbling because as I type it's 3:08 a.m.)

I had energy until the very second I sat down to create this post, so I won't be long.

Surfing the internet a.k.a my favorite card making blogs, I came upon two challenges that instantly inspired me so I created a card.


Let's strip...lol

I so adore the color combo!


Here's my creation:

The challenge was to use 'strips' of color or pattern in your card design & the color choice is pretty obvious.


Here's a close up of the detail on the banner...

I really love the look of stamping with the VersaMark watermarking ink pad! It's such an easy way to add a little detail without over powering your clean & simple look.

Ok. I'm officially about to pass out, so it's off to bed I go...
(AFTER I post my cards to the challenge galleries!)


I really hope you enjoyed my late night/early morning ramblings.
Please leave a comment and/or join! I'm really a lot of fun :o)

Have a great day!


Thursday, July 12, 2012

Using Graphic Stamps (SYS Day 4)

Hello blogger friends!

I've just come up for air from my craft area to share my creations for day 4 of the Stretch Your Stamps class. Today's lesson was using graphic stamps, which I must admit is my favorite style of stamp. They really work for the clean and simple style that I tend to enjoy.

Here's my creation:

I used a piece of vellum card stock to emboss my graphic print onto and layered it onto a shimmery eggplant colored card base. I embellished it with 2 different shades of purple bling and popped a sentiment across the bottom. 

I really liked how it came out...so much so, that I created a few more...

Here it is in Shades of green...


...shades of pink...


...and shades of red.

I'll be rummaging through my stash to find supplies to create on in shades of "Grey"...lol.
(I know at least ONE of you will get that joke!)


Anyway, here's a group shot for good measure:


P.S. I wanted to share a couple of tips/tricks that I discovered while creating this set.

I'm sure you noticed the wayward embossing powder on the purple birthday card in the set...
Trust me, it was much worse before I did a little work to it, which leads me to:

Tip #1: Use a white gel pen to fill in missing spots on images that have been heat embossed in white.
The solid petal shapes on the purple card were full of holes and spaces! All I did to fix it was go crazy with a white gel pen.
  (I was looking for a crisp bold image, not a distressed one)


Tip #2: Use a VersaMarker watermark pen to fill in any holes/spaces before you apply the embossing powder.

Before filling in
After filling in

Can you see how nice and solid the petal shapes look in the after photo?!?
It really made a HUGE difference in the end result...just check out the green, pink, & red cards.

Lastly,
Tip #3: Removing wayward embossing powder is a "breeze"!
(Excuse the pun...lol)

Don't you hate it when you've used your powder tool, inked the stamp ever so carefully, took care not to press too hard, and STILL end up with embossing powder in unintended areas?!? I know I do! Well I have a solution...use a dry paintbrush to brush it away.
 I'm sure you're saying "Duh, I already knew that! Tell me something new!" 
Well here it is...gently blow on it at the same time! (Hence the breeze pun above) I found that just using a dry paintbrush was just moving the powder around versus actually getting rid of it. A gentle blowing while moving the paintbrush over the loose particles works wonders. YAY!


That's all for today folks! Thanks ever so much for checking me out. I hope you learned something from my long-winded post today.
*Please comment/join*
Hope your day is marvelous!